Manage Resource Pool
The resource pool dialog is opened through Start > Properties > Resources. It contains all tabs for maintaining calendars, roles, personnel, teams, material, machine types, machine park, and project master data.

Tab Overview
Tab |
Content |
|---|---|
Calendar |
Working times, holidays, exceptions, shift models. |
Roles |
Professional qualifications with qualification levels and cost rates. |
Personnel |
Employees with calendar, roles, non-working days, and team assignment. |
Teams |
Groups of employees with capacity and cost calculation. |
Material |
Consumable material with unit of measure and unit price. |
Machine types |
Types and groups of machines with unit price. |
Machine park |
Concrete individual machines assigned to a machine type and a team. |
Project categories |
Classifications for projects. |
Project status |
Status values for projects. |
Project customers |
Customers with address and contact data. |
Import and export are available for most tabs through the Import and
Export buttons. Fields are separated by the # character.
Calendar Tab
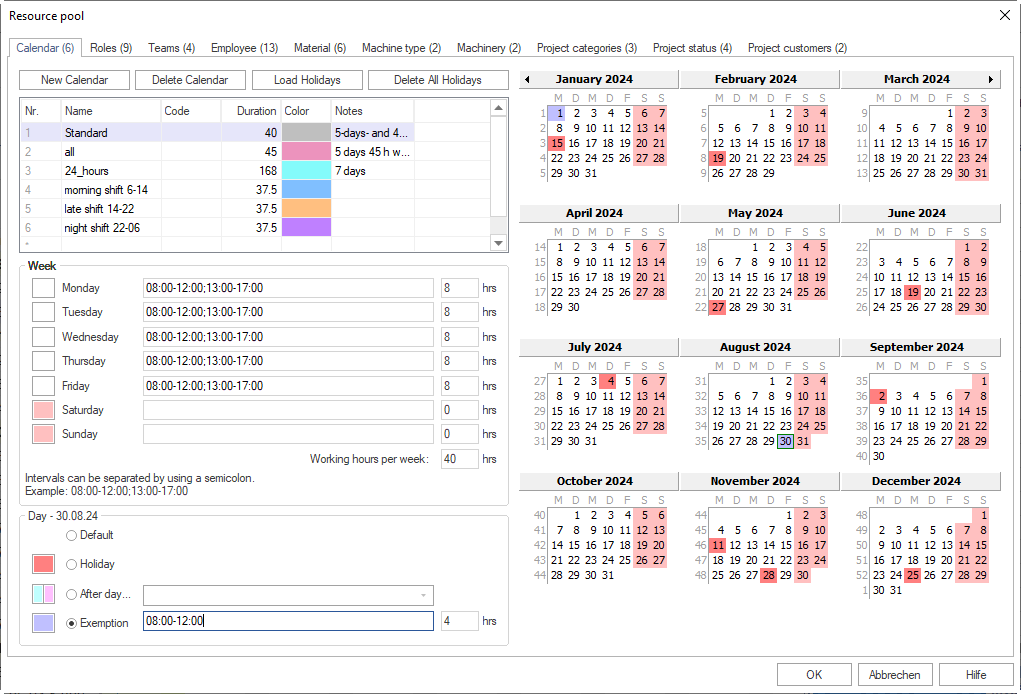
Calendars define the working days, working times, and holidays for projects, teams, and employees.
Create a calendar
Click New calendar, or enter a calendar name in the Name column of the row marked with
*.Optionally enter a unique code in the Code column.
Optionally select a colour in the Colour column for the display.
Define working times
In the Week area, define the working time for each weekday. Separate several intervals with a semicolon, for example
08:00-12:00; 13:00-17:00.In the Day area, define deviating daily rules:
Standard — resets a daily change to the weekday definition
Holiday — marks the day as a non-working holiday
By day… — applies the rules of another weekday
Exceptions — defines an individual working time for this day
Load holidays
Click Load holidays to download statutory holidays from Rillsoft servers. In the dialog, select Calendar (for example DE-All federal states), then the desired year or individual days.
Note
An internet connection is required for the download. Holidays that have already been loaded can be removed via delete all holidays.
Roles Tab
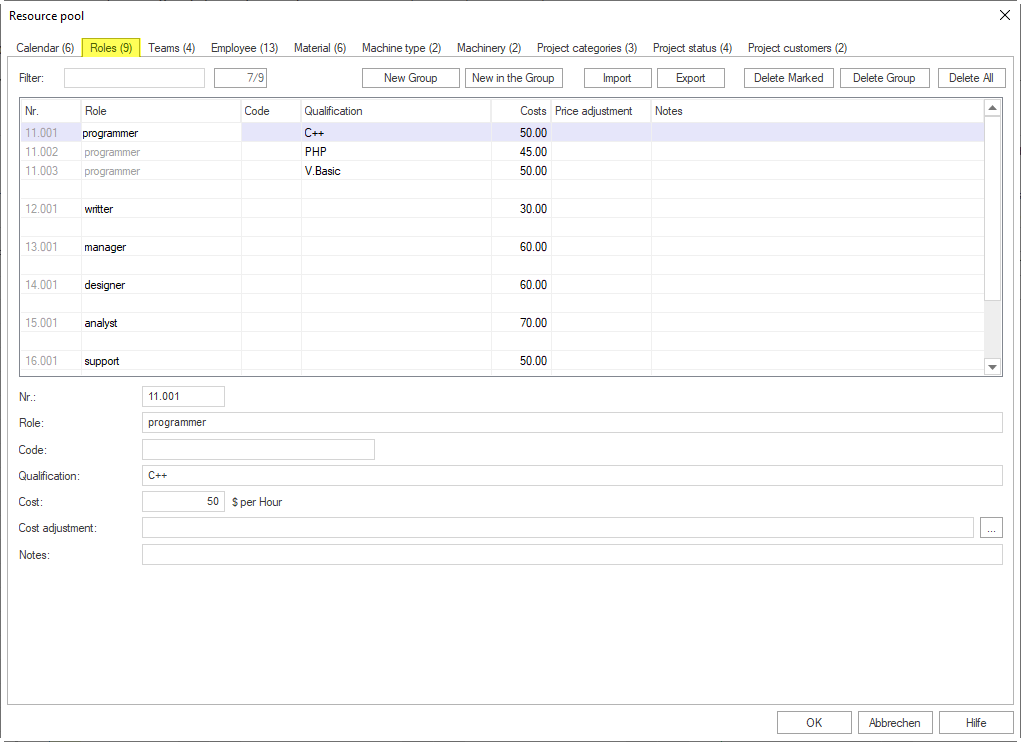
Roles describe professional qualifications. In this help, roles are therefore referred to as professional qualifications (examples: designer, welder, installer, foreman).
Roles are organised in groups. Each group corresponds to a job title; the sub-entries are qualification levels (example: carpenter → foreman, master, journeyman, apprentice).
Create roles
Click New group, or enter a new group name in the Role column of the
*row.Enter the qualification level in the Qualification column. Enter further levels in the following rows — the group label is copied automatically.
Optionally enter a unique code for data exchange in the Code column.
Enter the cost per hour in the Costs field.
Optionally enter a date and a coefficient or new unit price for future cost changes in the Cost change field.
Optionally enter a note in the Notes field.
Import/export fields: ID, Role (required), Code, Qualification (required), Costs, Cost change, Notes.
Teams Tab
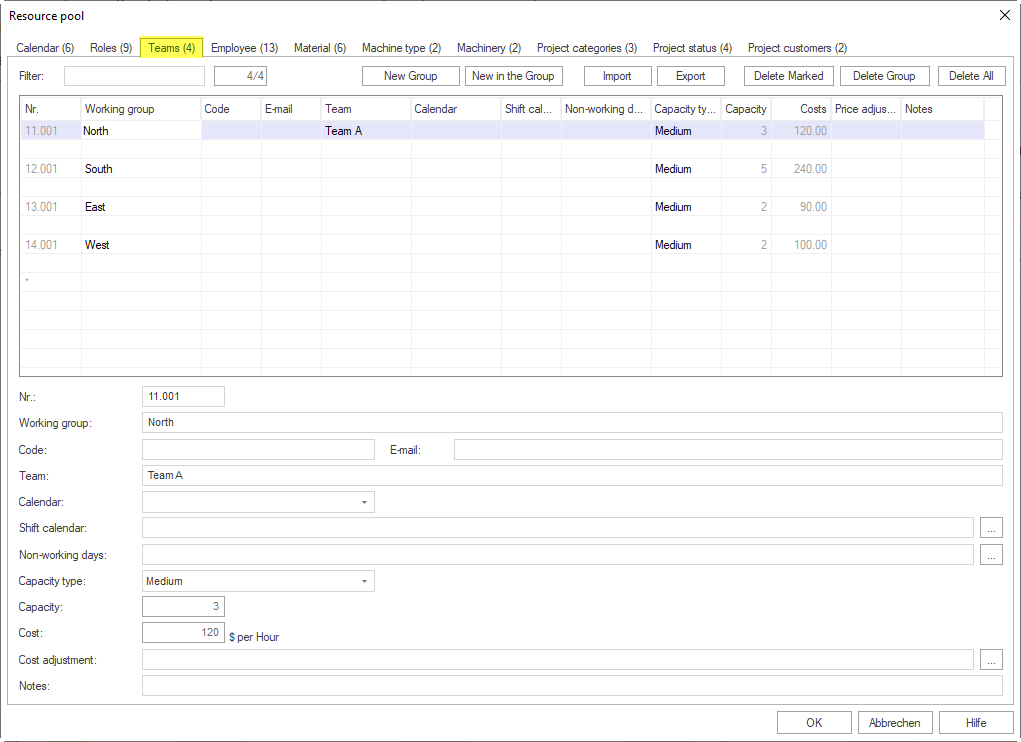
Teams group employees organisationally. Teams are organised in groups (team types) (example: tiler team → early shift team, late shift team).
Create teams
Click New group, or enter a new group name in the Work group column of the
*row.Enter the team name in the Team column. Enter further teams in the following rows — the group label is copied automatically.
Note
Group labels can only be changed in the first row of the group. The change is automatically transferred to all sub-teams.
Optionally enter a unique code in the Code column.
Optionally enter a team email address in the Email column.
Optionally select a team calendar from the Calendar drop-down list. Without a calendar, the hierarchy applies: activity calendar → project calendar.
Optionally enter absence times of the team in the Non-working days field (example:
18.03.05-22.04.05; 25.05.05).Select in the Capacity type drop-down list how capacity and costs are calculated:
Option
Calculation
Fixed
Manual entry in Capacity and Costs. Only suitable if no concrete personnel is assigned.
Optimistic
Highest productivity and the corresponding cost rate of each team member.
Real
Real cost rate and corresponding productivity of each team member.
Average
Averaged value from the productivity and cost rate of each team member.
Optionally enter a date and a new price or coefficient in the Cost change field.
Optionally enter a note in the Notes field.
Import/export fields: ID, Work group (required), Code, Email, Team (required), Calendar, Non-working days, Capacity type, Capacity, Costs, Cost change, Notes.
Employee Tab
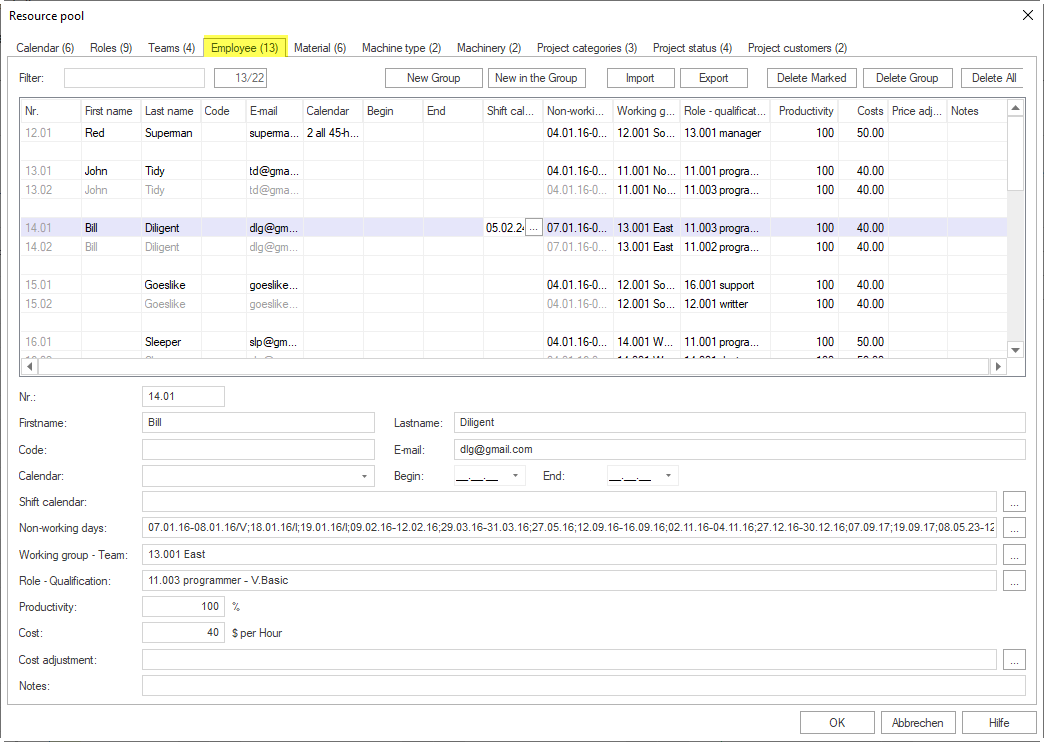
On the Employee tab, you maintain employees with calendar, entry and leaving dates, shift calendars, non-working days, team assignments, roles, productivity, and costs.
Note
Create the required teams, roles, and calendars before defining employees. These master data records are used in the drop-down lists on the Employee tab.
Create employees
Click New group, or enter a new employee in the
*row.Enter the employee name in the First Name and Last Name columns.
Optionally enter a unique code in the Code column for data exchange with other applications.
Optionally enter the employee email address in the Email column.
Optionally select a calendar from the Calendar drop-down list. If no calendar is selected, Rillsoft Project searches for a valid calendar in this order: team calendar -> activity calendar -> project calendar.
Optionally enter the date on which the employee entered the company in the Entry field.
Optionally enter the date on which the employee left the company in the Leaving field.
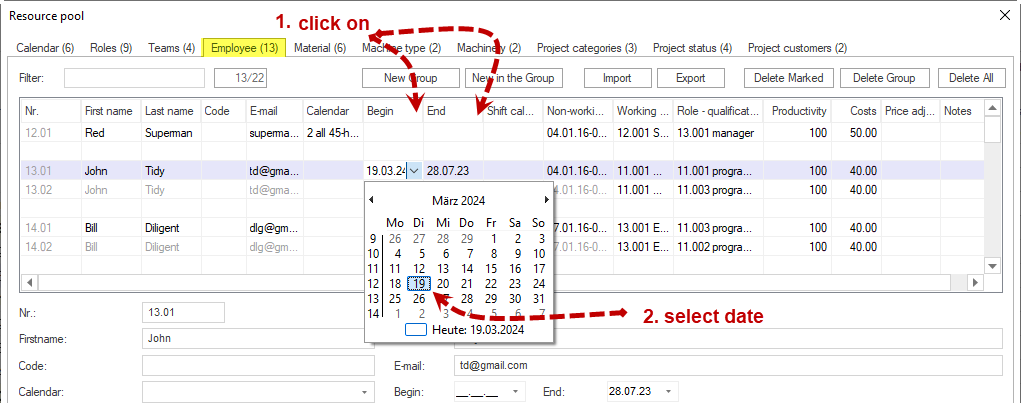
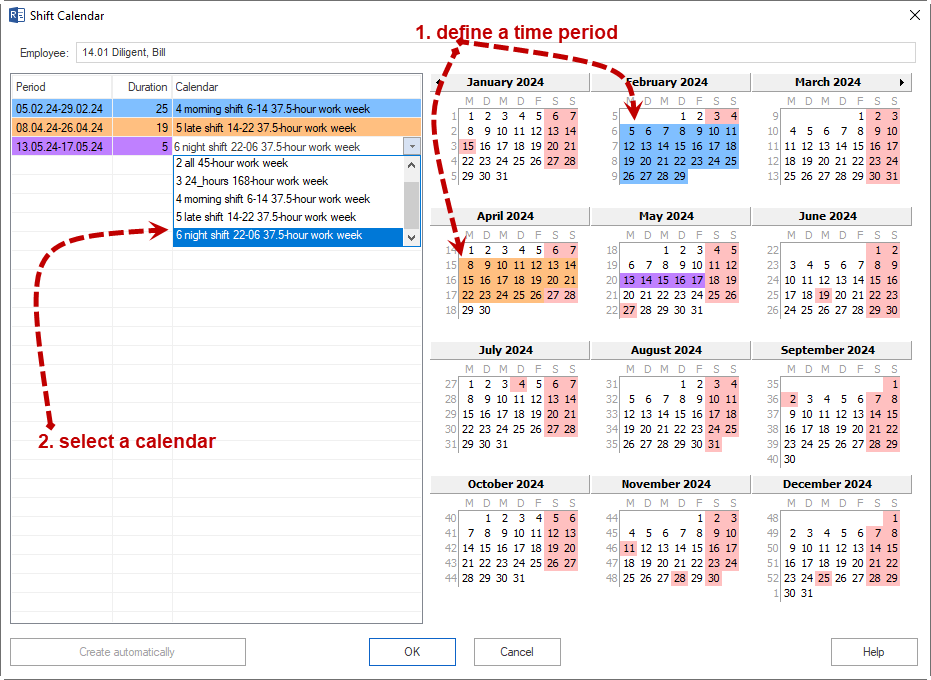
Click in the Shift calendar field if an employee works in different periods according to different calendars. First select the period with the left mouse button pressed, then select the required calendar for this period.
Optionally enter the employee’s non-working days in the Non-working days field, for example job training, workshops, vacation, or illness (example:
18.03.05-22.04.05; 25.05.05; 08.06.05-17.06.05).Note
Employee non-working days are added to the non-working days defined for the assigned team.
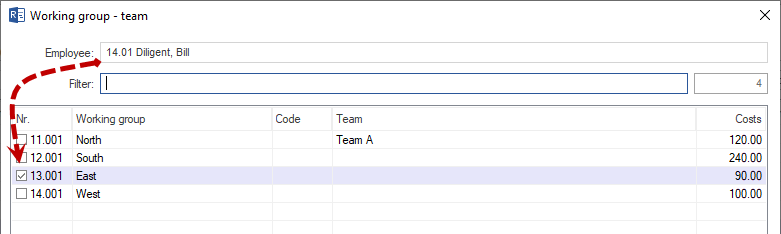
Optionally select the team to which the employee belongs from the Work group - Team drop-down list.
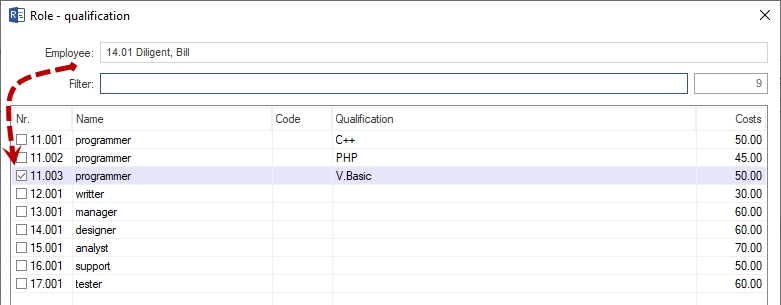
Optionally select the role or qualification that the employee can perform from the Role - Qualification drop-down list.
Optionally enter a different value for the calculated productivity of the employee in percent in the Productivity field.
Optionally enter a different hourly rate in the Costs field.
Optionally enter a date and either a coefficient for the existing hourly rate or a new hourly rate in the Cost adjustment field.
Optionally enter a note in the Notes field.
Assign additional roles, teams, costs, and productivity
If an employee needs additional roles, team assignments, productivity values, or cost rates, enter the additional assignment in the row directly below the same employee.
Warning
Do not create the same employee again in another * row. Use the following
rows of the existing employee for additional assignments to avoid
inconsistencies in project planning.
Import/export fields: ID, First Name, Last Name (required), Code, Email, Calendar, Entry date, Leaving date, Non-working days, Team, Role, Productivity, Costs, Cost adjustment, Notes.
Note
For employee import, the txt file must contain exactly 14 # separators
per line. A different number produces an error message. Missing values remain
empty at the corresponding position.
Material Tab
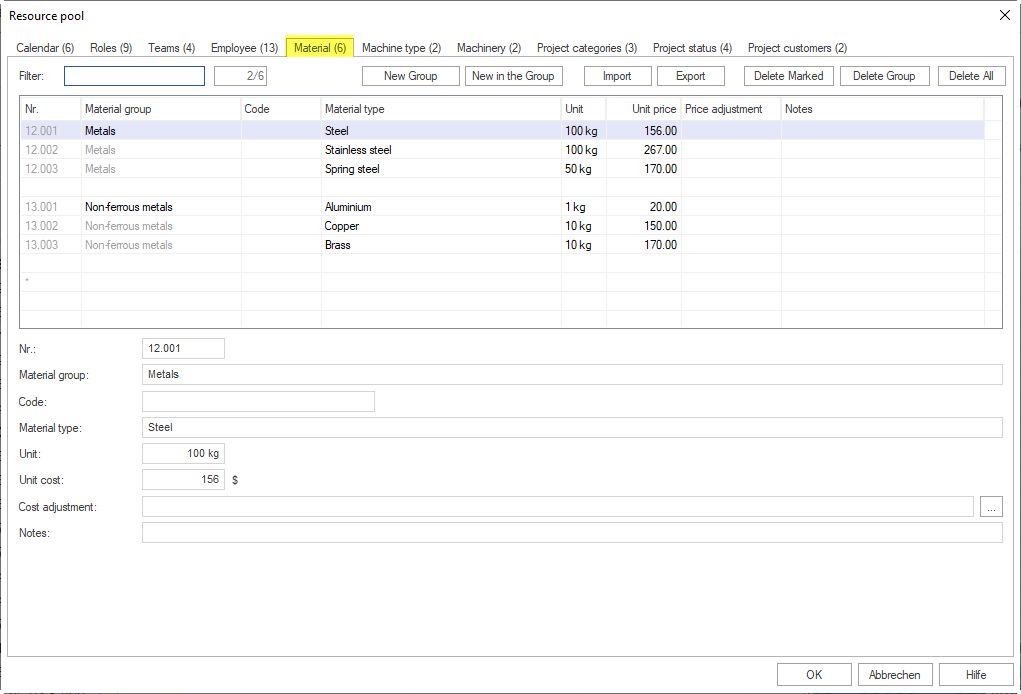
Material (consumable material) is organised in material groups (example: building-construction ready-mixed concrete → ready-mixed concrete BI: B 5 KS).
Create material
Click New group, or enter a new group name in the Material group column of the
*row.Enter the material type designation in the Material type column. Enter further types in the following rows.
Optionally enter a unique code in the Code column.
Enter the unit of measure in the Unit field (example: tonnes, m², piece).
Enter the cost per unit of measure in the Unit price field.
Optionally enter a date and a coefficient or new price in the Price change field.
Optionally enter a note in the Notes field.
Import/export fields: ID, Material group (required), Code, Material type (required), Unit, Unit price, Price change, Notes.
Machine Types Tab
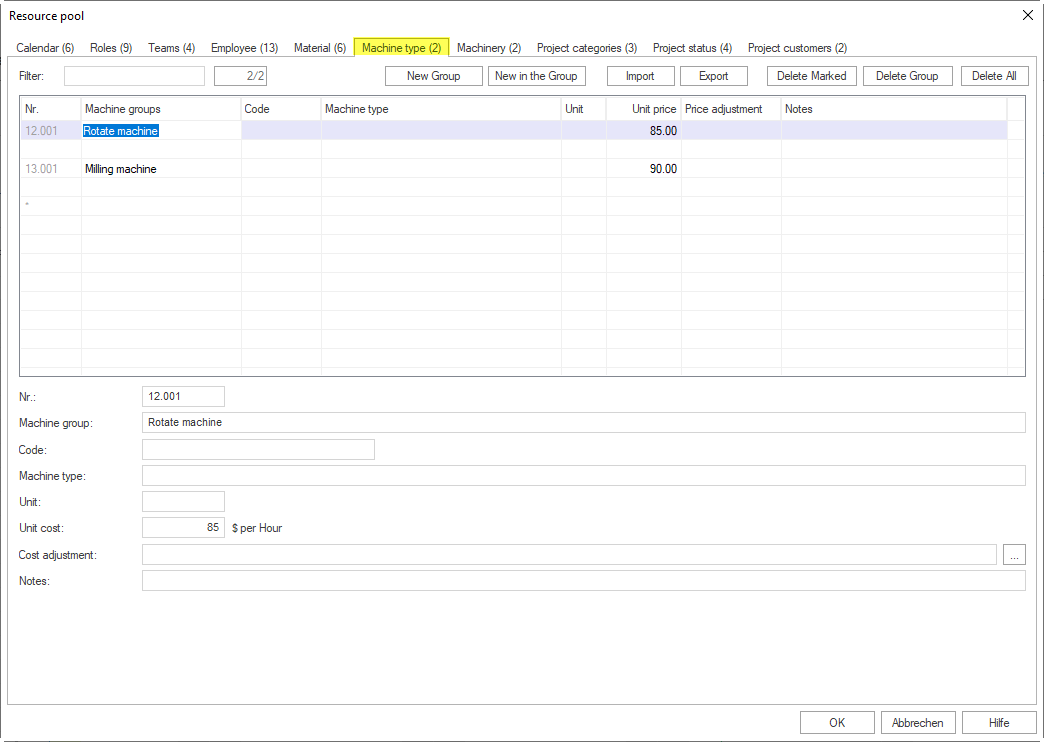
Machine types describe types and groups of machines or devices (example: mini cranes → mini crane type 10 t, mini crane type 100 t).
Create machine types
Click New group, or enter a new group name in the Machine group column of the
*row.Enter the machine type in the Designation column. Enter further types in the following rows.
Optionally enter a unique code in the Code column.
Enter the unit of measure in the Unit field (example: piece).
Enter the cost per hour of the machine type in the Unit price field.
Optionally enter a date and a coefficient or new price in the Price change field.
Optionally enter a note in the Notes field.
Import/export fields: ID, Machine group (required), Code, Machine type (required), Unit, Unit price, Price change, Notes.
Machine Park Tab
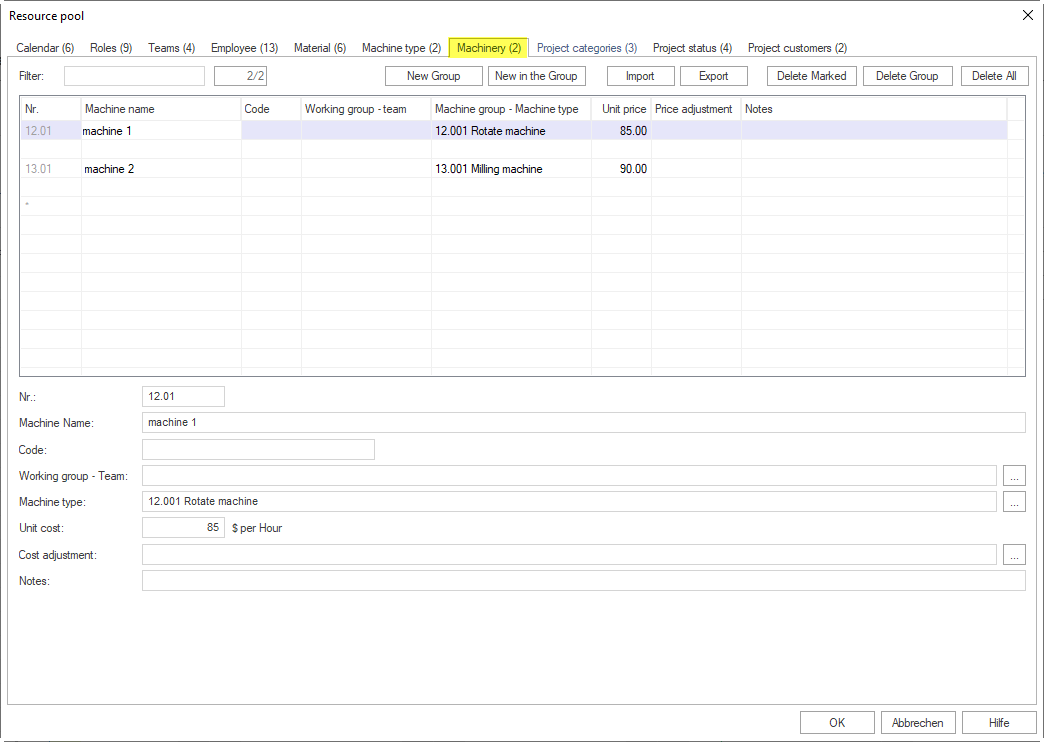
The machine park contains concrete individual machines that are assigned to a machine type.
Create machine park
Click New group, or enter a new name in the Machine name column of the
*row.Optionally enter a unique code in the Code column.
Optionally select the team this machine belongs to from the Work group - Team drop-down list.
Select the associated machine type from the Machine group - Machine type drop-down list.
Enter the cost per hour of the machine in the Unit price field.
Optionally enter a date and a coefficient or new price in the Price change field.
Optionally enter a note in the Notes field.
Import/export fields: ID, Machine name (required), Code, Work group - Team, Machine group - Machine type (required), Unit, Unit price, Price change, Notes.
Project Categories Tab
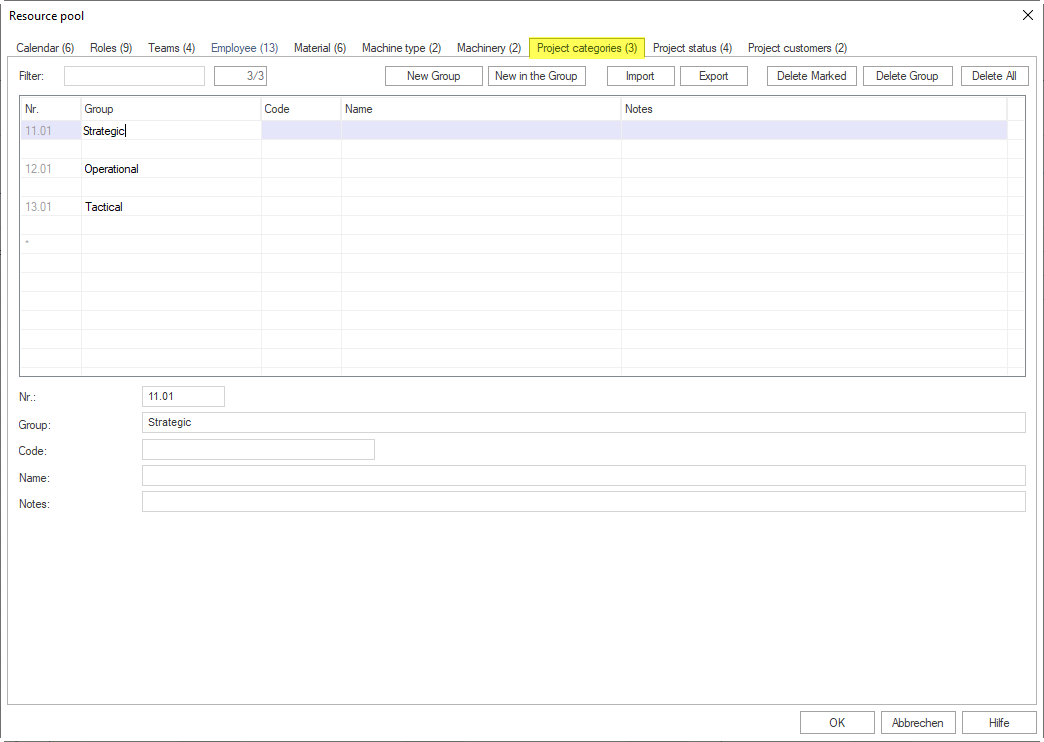
Project categories classify projects (example: building construction, infrastructure, maintenance).
Create project categories
Click New group, or enter a group name in the Group column of the
*row.Enter the category in the Name column. Enter further categories in the following rows.
Optionally enter a unique code in the Code column.
Optionally enter a note in the Notes field.
Project Status Tab
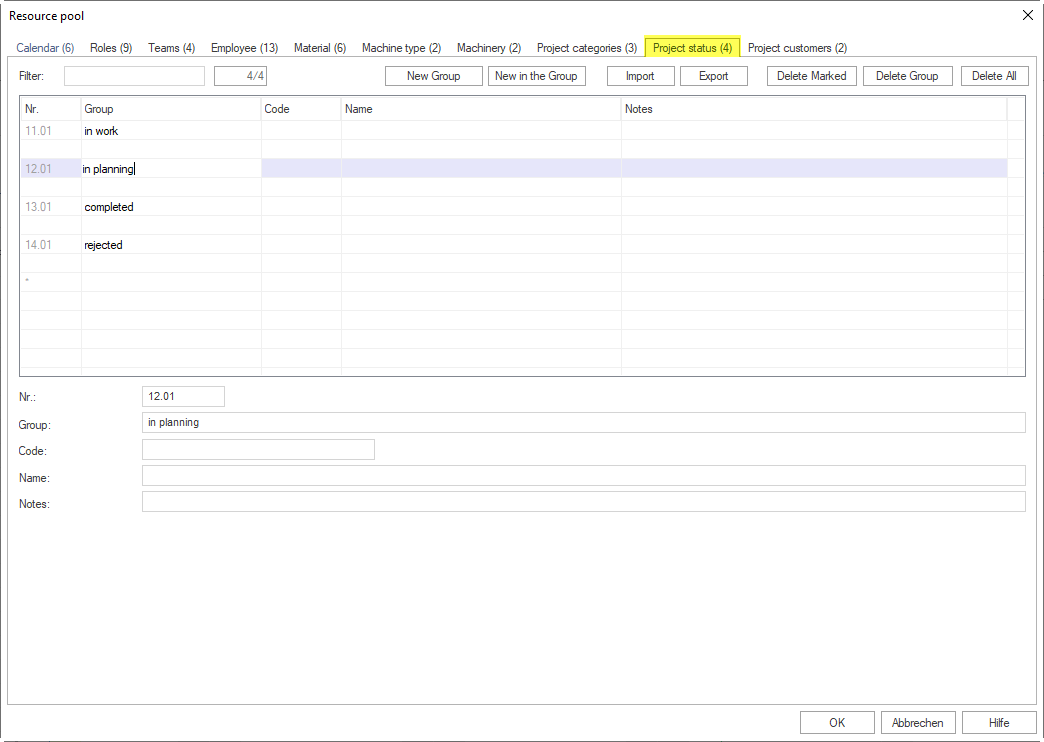
Project status values describe the processing state of a project (example: in planning, active, completed, archived).
Create project status
Click New group, or enter a group name in the Group column of the
*row.Enter the status value in the Name column. Enter further levels in the following rows.
Optionally enter a unique code in the Code column.
Optionally enter a note in the Notes field.
Project Customers Tab

Project customers manage clients and customers with their address and contact data.
Create project customers
Click New group, or enter a customer name in the Name column of the
*row.Enter contact data in the group columns: address, contact person, email, telephone.
Optionally enter a unique code in the Code column.
Optionally enter the URL in the Website column.
Add further branches or contact persons in the following rows — the customer name is copied automatically.
Available address fields: street, postal code, city, state, country.
Import/export fields: No., Name (required), Code, Street, Postal code, City, State, Country, Contact person, Email, Telephone, Notes.
Note
For the customer import, the txt file must contain exactly 11 #
separators per line (number of columns minus 1). A different number produces
an error message.
Filtering
All tabs of the resource pool contain a Filter field. Enter a search term or part of it to search specifically for an entry.