Assign employees
In order to assign employees to the selected activities, do as follows:
Activate the tab Employees in the window Activity properties.

Assigned roles
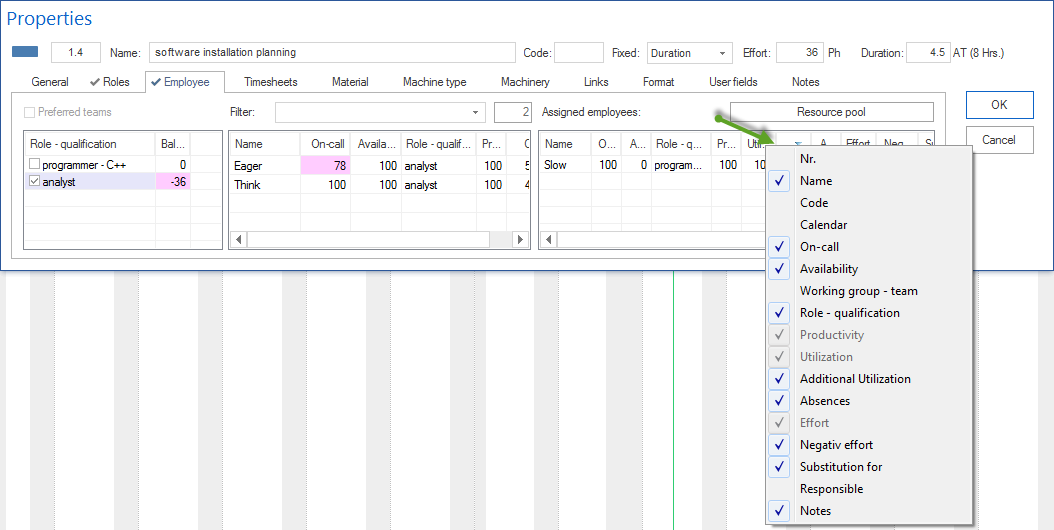
Mark the check box of a role in the list Assigned roles in order to use this role as additional filter for the employees list. The list of employees shows you only those employees who have the appropriate roles and qualifications.
The column Quantity-workload-effort contains the required number of employees whose workload and effort meet the demands of the role. This column is deactivated by default. If you want to unhide it, please refer to Details.
The field Balance contains the dynamically calculated difference between the requested effort for a role and the summarized effort of the already assigned employees with the same role and qualification. This serves as support during the controlling of the required assignations of employees. A negative value, for instance, indicates that more employees with this role and qualification are required.
Preferred teams
Mark the check box Preferred and assigned teams to use the assigned teams as an additional filter for the employees list. The list of employees will show you then only those employees that belong to assigned teams.
Available employees - The table in the centre lists, depending on the filter settings (teams, roles, and entries in the field filter), all employees defined in the resource pool and available for being assigned to actual activities.
Enter a string value in the field Filter to show only certain employees (search via employee name and code) or enter two dots “..” in order to view the employees that have already been used in the project.
On-call - percentage of the possible working capacity of an employee within activity duration, adjusted for the reported non-working days (holidays/sickness).
Availability - percentage of the possible working capacity of an employee within activity duration, adjusted for the participation of the employee in other activities of the project.

To include the workload in other projects that belong to a selected portfolio during scheduling, open the desired portfolio:
Click on Start > Properties > Info

Select the tab Portfolio dashboard.

Doubleclick on the entry in the central table to assign this employee to the activity.

Assigned employees
On-call - percentage of the possible working capacity of an employee within activity duration, adjusted for the reported non-working days (holidays/sickness).
Availability - percentage of the possible working capacity of an employee within activity duration, adjusted for the participation of the employee in other activities of the project as well as their workload in this activity.
Enter a differing value in percent in the field Productivity if the productivity of the employee in the activity differs (they are proposed from the resource pool).
Enter a differing value in percent in the field Workload if the employees workload in the activity differs. If you have reported a role usage to the tab Roles, this workload will be taken over; otherwise, default workload is 100%.
If you click on the icon in the field Absence, the window Absence with the calendar field opens where you can define the days the employee will not be participating in the activity.
Enter a differing value in the field Effort for the effort that an employee has to perform within the activity.
Select the check box Responsible, if the employee is to be registered as the person responsible for the activity.
Enter notes that might be crucial for the employee in connection with the activity in the the field Notes.
Mark the check box Utilize resources to the maximum in order to obtain the shortest possible activity duration. This redistributes the effort of the resources with identical qualifications in a way to allow for a better resource utilization, which can affect the activity duration by, for instance, a higher percentage of readiness.
Click on the button OK.
Notes:
You can adjust the layout of the columns of the three tables at your convenience by rightclicking on the column names of the table and selecting the columns you want to adjust.

In order to have quick access to the used resources, click on the button Resource pool if you are using the general resource pool - or on the button Project resources if you are using a project-specific resource pool.
